
If you’re dealing with roof damage after a storm, understanding storm damage inspection report details isn’t just helpful, it can directly impact whether your insurance claim gets approved or denied. Around Austin and the surrounding Central Texas areas, hailstorms and high winds can leave behind damage that isn’t always obvious from the ground, which is exactly why this report matters so much.
Most homeowners don’t realize how much weight this one document carries until they’re in the middle of a claim. It’s not just a checklist or a few photos. A properly written inspection report ties the damage back to a specific storm, documents exactly what was found, and lays out what needs to happen next. Without it, you’re basically trying to prove your case with incomplete information.
That’s where things can get frustrating. You might have already had someone look at your roof and say it needs repairs or even a full replacement. But if that assessment isn’t backed by a detailed, written report with photos, measurements, and clear notes, insurance companies tend to push back or delay decisions.
This guide walks through what a real storm damage inspection report should include, especially for homeowners in Austin, Round Rock, Cedar Park, and nearby areas. By the end, you’ll know what to look for, what shouldn’t be missing, and how to make sure you’re not left guessing when it comes time to move forward.
Key Takeaways
- A storm damage inspection report is a written, photo-rich document that details roof and property damage after an Austin-area storm, including hail, wind, heavy rain, or tornado spinoffs. This detailed report serves as the foundation for insurance claims and repair planning.
- A complete report covers exterior roof components, attic and interior observations, site conditions, safety hazards, and includes repair recommendations with estimated timelines and costs specific to the Central Texas market.
- Insurers in Central Texas rely heavily on this report along with verified weather data to approve claims tied to specific storm dates, such as the April 8, 2024 hailstorm in North Austin or the September 24, 2023 hail event that moved through Round Rock.
- Austin homeowners should always request a written, itemized inspection report with date-stamped photographic evidence instead of accepting only a verbal “you need a new roof” opinion.
- This guide focuses specifically on what a storm damage inspection report should contain for homes in Austin and nearby cities like Cedar Park, Pflugerville, Round Rock, Buda, and Kyle.
Why Your Storm Damage Report Matters in Austin
Central Texas sits squarely in what meteorologists call “Hail Alley.” Golf-ball-sized hail, 60+ mph wind gusts, and sudden downpours routinely sweep through Austin and surrounding suburbs from spring through early summer. These severe weather events can leave roofs battered in ways that aren’t always visible from the ground.
Many homeowners first learn about roof damage when a roofing contractor knocks on their door or an insurance adjuster mentions potential issues. But the formal storm damage inspection report—not a quick verbal assessment—is the document that actually drives repair plans and insurance approvals. Without it, you’re essentially negotiating blind with your insurance company.
This piece will break down every section a thorough inspection should include, so you can spot missing details and push back if a contractor’s write-up is too vague. Consider this a practical checklist for anyone dealing with storm damage in the Austin area.
Here’s a concrete example: during a 2024 hailstorm that hit Northwest Austin’s Anderson Mill and Cedar Park corridor, homeowners with clear photo evidence and density measurements in their inspection reports saw claims approved that were initially denied. The difference wasn’t luck—it was documentation. This article is written from the perspective of a professional roof inspector serving Greater Austin, not an insurance provider.
Overview: What Is a Storm Damage Inspection Report?
A storm damage inspection report is a structured document created after a professional inspection of a property following a specific storm event. It includes the date, storm type, and affected location in the Austin area—not just generic findings.
A complete report normally contains:
- Property details and homeowner information
- Storm context with specific dates and weather data
- Observed damage with measurements and locations
- Photos with labels and captions
- Repair recommendations and cost estimates
- Insurance-friendly summaries
These reports can be written by roofing contractors, independent inspectors, or engineers. The most useful ones for Austin homeowners follow a consistent format that insurers recognize and trust.
This is fundamentally different from a free roof inspection or quick estimate. A real storm damage roof inspection report is detailed, written, and can stand up to scrutiny from an insurance adjuster or city inspector. Free storm damage roof repair inspections might identify problems, but they rarely provide the documentation depth needed for the insurance claim process.
The rest of this article walks through each key section and what should—and should not—be missing when storms hit places like South Austin, Hutto, Leander, or anywhere else in the region.
Section 1: Property & Storm Event Details
The first section of any storm damage inspection report should establish the basics. This includes:
Property Information:
- Full property address (including city and county—Travis, Williamson, or Hays)
- Homeowner’s name
- Structure type (one-story ranch, two-story, townhome)
- Roof type and age (e.g., 30-year architectural asphalt shingles installed in 2017)
- Previous major repairs or replacements
Storm Event Specifics:
The report must clearly state the specific severe storm being evaluated. Insurers reject vague references to “recent storms.” Instead, it should read something like: “Hail and wind event on May 9, 2024 in South Austin (Travis County).”
Basic weather data should be included:
- Approximate hail size reported (e.g., 1.25 inch diameter)
- Highest recorded wind speeds
- Rainfall totals
- Data sources (NWS, Stormersite, or local meteorological services)
This section ties the inspection date to the storm date, establishing the causation link insurers require. The inspection should ideally occur within 48-72 hours of the storm for the strongest documentation.
Section 2: Exterior Roof Condition & Damage Summary
This section forms the core of any storm damage roof inspection, summarizing overall roof’s condition before diving into specifics.
The inspector should rate the roof as good, fair, or poor, with a clear statement about whether storm related damage was found. For Austin roofs, this should specifically comment on what trusted roof repair services in Austin will ultimately need to address:
- Shingles or panels (asphalt shingles, metal, tile)
- Drip edge condition
- Ridge caps
- Valleys
- Penetrations (vents, pipes, skylights, chimneys)
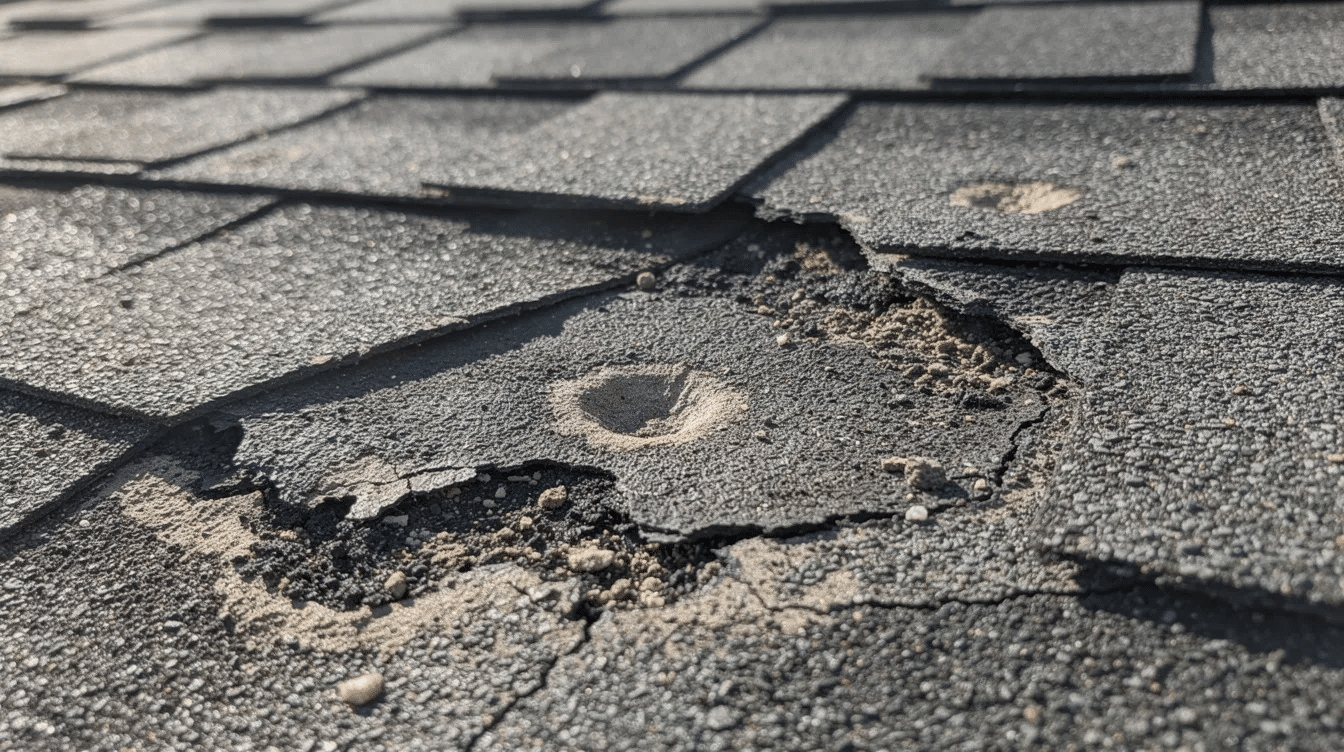
Storm-Related Issues to Document:
- Hail impact marks and granule loss
- Bruised or fractured shingles
- Lifted shingles or creased shingles from wind damage
- Missing shingles or displaced shingles
- Broken tiles or panels
The report should include approximate damage density. For example: “10–12 hail impacts per 100 sq ft on north slope, 4–6 impacts per 100 sq ft on south slope.” Insurers use this level of detail when deciding on roof repair versus full replacement. Generally, damage affecting under 10% of the roof area points toward repairs, while damage exceeding 25-30% typically justifies replacement.
Main Findings by Slope:
- Front slope: [condition and damage noted]
- Back slope: [condition and damage noted]
- Left slope: [condition and damage noted]
- Right slope: [condition and damage noted]
This format helps both homeowners and adjusters quickly assess severity and understand what they’re looking at.
Section 3: Detailed Roof Component Findings
This section breaks down individual components so readers—and insurance adjusters—can see exactly what was inspected and what sustained damage.
Field Shingles/Tiles/Metal
Document the condition of the primary roofing materials. Note hail dents (typically 0.5-2 inch diameters), wind-lifted tabs where seals have been compromised, and any damaged shingles or loose shingles. Specify whether you’re dealing with existing damage or fresh storm damage.
Flashing (Wall, Step, Chimney)
Flashing is particularly vulnerable to high winds. Document bending, lifting, or separation. Example: “Linear 25 feet of step flashing along east wall above garage, bent and lifted by 60 mph winds.”
Ridges, Hips, and Valleys
These areas often see the worst wind damage. Note granule loss on cap shingles, splits, lifted edges, or complete cap failure.
Vents and Penetrations
Count and document dented exhaust vents, cracked pipe boots, damaged skylights, and any chimney cap issues. Example: “5 dented exhaust vents on north slope, consistent with 1.25-inch hail damage.”
Gutters and Downspouts
Note dents, pulling away from fascia, or clogging that could cause water backup. Heavy rain combined with debris accumulation can compromise these systems.
Visible Roof Decking and Roof Boards
Where accessible, note any soft spots indicating water infiltration, daylight visible through decking, or visible damage to the roofing system’s substrate.
Measurements Matter:
- Linear feet of damaged flashing: _
- Number of vents dented: _
- Number of missing shingles: _
- Approximate roof square footage affected: _
Section 4: Attic, Ceiling, and Interior Observations
A thorough roof inspection for storm damage extends beyond the exterior. A professional inspection should always include attic and interior checks.
Attic Observations:
The report should document whether the inspector entered the attic and what was found:
- Damp insulation (moisture content above 15% indicates fresh infiltration)
- Visible daylight through decking (indicating punctures from hail or debris)
- Water stains on rafters or trusses
- Mold or mildew near exhaust vents (black spotting signals recent saturation)
- Musty odors suggesting water intrusion
Austin’s humid post-storm climate can foster rapid mold growth—sometimes within 48 hours when humidity exceeds 60%.
Interior Observations:
Ceiling stains, peeling paint, or warped drywall in rooms below roof valleys or skylights should be documented with room names. Example: “Primary bedroom ceiling, northwest corner, Pflugerville home—fresh water staining aligned with valley leak point.”
The inspector should clarify whether these issues appear fresh and likely related to the referenced storm, or pre-existing based on dust overlay or staining patterns. This differentiation of hidden damage from existing damage is critical for the insurance process.
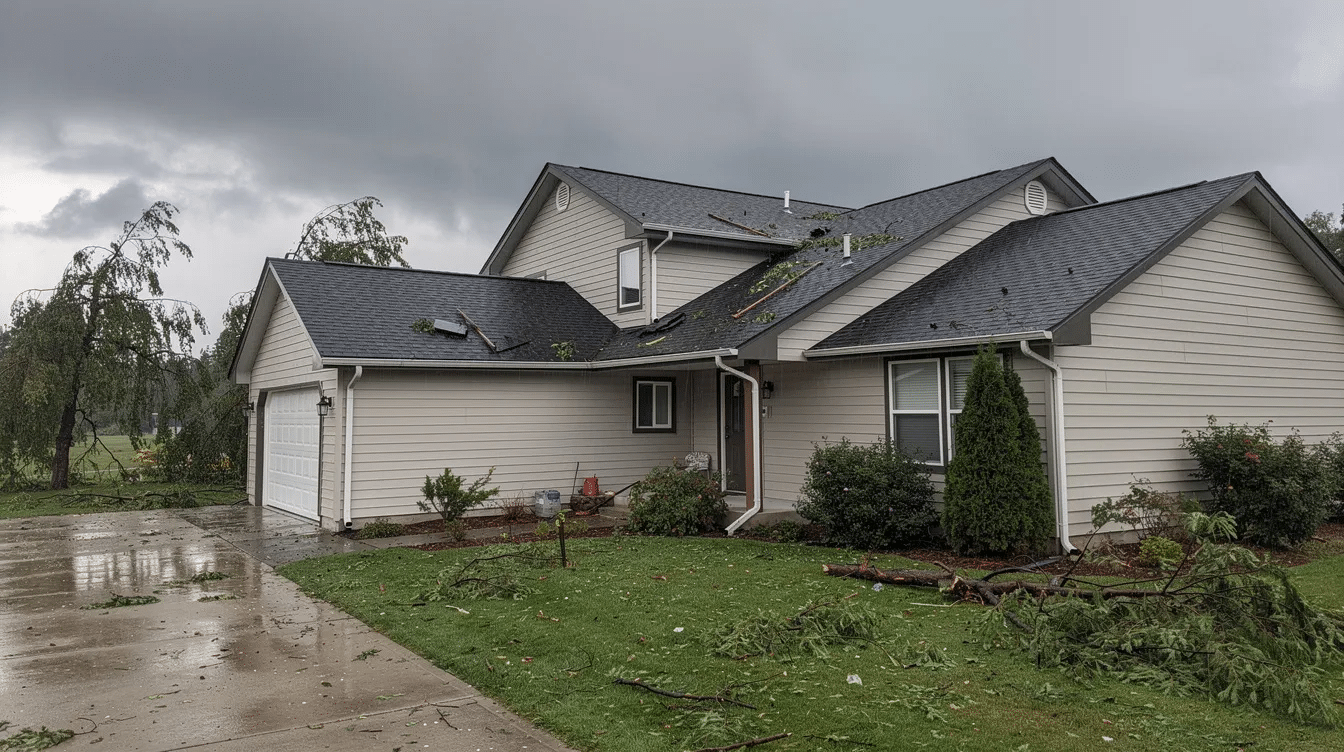
Section 5: Site Conditions, Safety Hazards, and Code Issues
Austin-area reports should document ground-level conditions and hazards observed during the inspection process.
Site Hazards:
- Fallen branches obscuring roof access or damaging structures
- Broken skylight glass on walkways
- Loose roofing debris around driveways
- Damaged fences or outbuildings
Safety Concerns:
The report should flag immediate safety issues:
- Partially detached gutters over entryways (fall risk)
- Loose fascia at eaves
- Unstable roof sections unsafe for ladder access
- Visible structural damage requiring immediate attention
Code Compliance Issues:
For Austin and Travis County jurisdiction, note any code issues that will affect necessary repairs:
- Missing drip edge (required per IRC R905.2.8.5)
- Inadequate ventilation (minimum 1/150 net free area)
- Non-compliant underlayment on pre-2012 roofs
- Issues affecting proper installation of replacement materials
Williamson County (Round Rock, Cedar Park) enforces similar IRC amendments.
Emergency Recommendations:
Include a statement about whether temporary emergency measures are needed within 24 hours—tarping, sealing, debris removal—to protect the home from future storms and further rain damage, and whether you should contact emergency roofers in Austin for rapid tarping and repairs. Emergency tarping in Austin typically costs $500-1500.
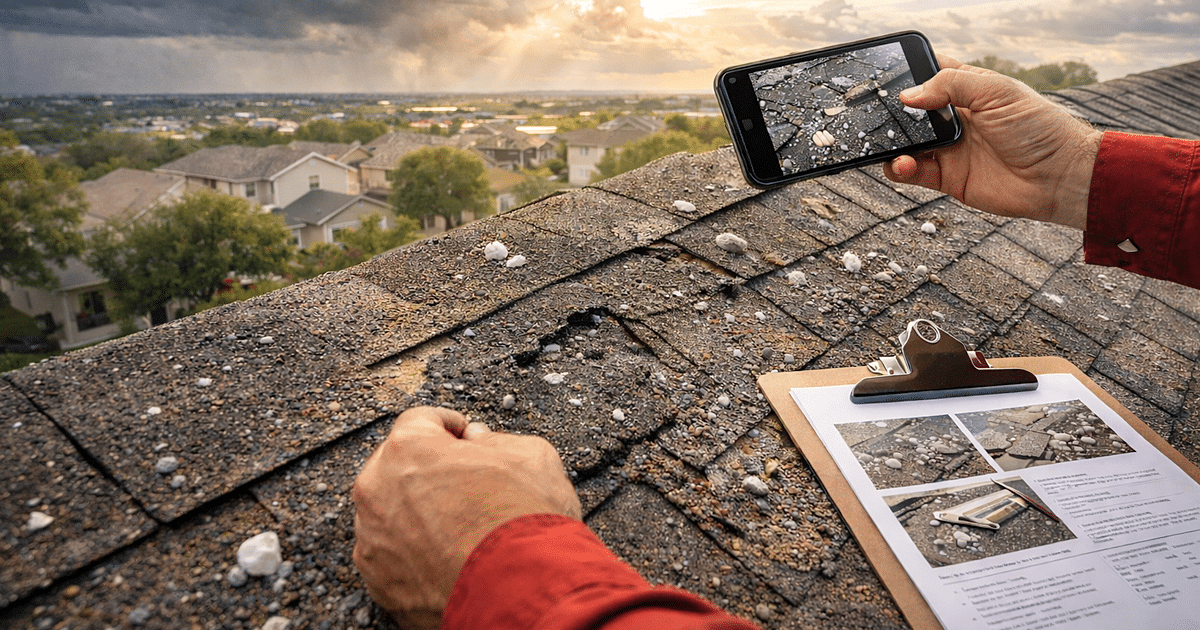
Section 6: Photographic Evidence and Diagrams
Strong storm damage reports for insurance use in Texas must contain clear, labeled photos with dates—not just text descriptions. Studies show photo-backed claims are approved 40% faster than those without comprehensive documentation.
Required Photo Types:
- Wide shots of each roof slope (with directional labels: N/S/E/W)
- Close-ups of representative hail hits with ruler for scale
- Lifted or damaged shingles from multiple angles
- Damaged flashing, vents, and penetrations
- Interior water staining with room identification
- Granule accumulation in gutters
Use directional labels and reference visible damage along with landmarks (chimney, satellite dish, front driveway) to help adjusters orient themselves. This is especially helpful when adjusters review Austin homes remotely.
Diagrams and Sketches:
Simple roof diagrams marking damaged areas add significant value. These should note:
- Impact zones by slope
- Damage density (hits per 100 sq ft)
- Wind direction patterns
- Most affected areas
For larger properties in Georgetown, Dripping Springs, or Westlake, drone aerials can capture hard-to-reach areas on steeper roofs.
A comprehensive inspection report should include 8-50 date-stamped, high-resolution images, GPS-tagged for location verification, similar to what’s provided with professional roof inspection certifications and reports.
Section 7: Repair Recommendations, Scope, and Cost Ranges
The report should transition from “what we found” to “what needs to be done,” clearly separating storm-related work from optional upgrades or pre-existing regular roof maintenance needs that may have surfaced during a routine roof inspection for early warning signs.
Scope of Work Categories:
| Repair Type | When Recommended | Austin Market Cost (2026) |
|---|---|---|
| Spot shingle replacement | Under 5% damage | $150-300 per square |
| Full-slope replacement | Over 20% damage | $400-600 per square |
| Flashing replacement | Bent or lifted sections | Per linear foot pricing |
| Emergency tarping | Immediate protection needed | $500-1500 |
| What to Include: |
- Specific slopes or sections requiring work
- Material specifications (match existing roofing materials)
- Storm damage repairs vs. optional upgrades
- Whether impact resistant shingles are recommended (Class 4 adds 20-30% cost but may qualify for insurance discounts)
Timelines:
- Emergency tarping: Within 24 hours of inspection
- Peak season lead times: 4-8 weeks post-hail in April-May
- Typical job duration: 1-3 days for 20-square roof
This section should read like a concise project plan written in plain language so homeowners in Manor, Buda, or Kyle can understand their options without technical expertise. A detailed estimate helps homeowners compare repair estimates from multiple roofing contractors.
Section 8: Insurance-Friendly Summary and Documentation Notes
A well-crafted Austin storm damage inspection report ends with a summary tailored for handling insurance claims—not just contractor sales purposes.
Causation Statement:
For larger properties or mixed-use buildings, the same structure used in commercial roof inspection reports can help clearly separate storm-related damage from long-term wear.
Restate in 1-2 paragraphs whether damage is consistent with the named storm event. Example: “Fresh hail bruising patterns and damage density are consistent with the April 2025 hail event, as documented by NWS radar data for Travis and Williamson counties. Damage patterns align with prevailing storm trajectory from southwest to northeast.”
Supporting Documents Checklist:
The report should list all materials included:
- Weather printouts from NWS or meteorological services
- All inspection photos with captions
- Roof diagrams with damage markings
- Moisture meter readings (if applicable)
- Previous maintenance invoices shared by homeowner
- Prior inspection reports for baseline comparison
Documentation Retention:
Include a clear statement that the homeowner should keep copies of the report, photos, and invoices for future storms. Texas insurers often review prior claims and documentation history, so digital backups are essential.
Adjuster Quick Reference:
| Key Fact | Detail |
|---|---|
| Storm Date | [Specific date] |
| Most Affected Slopes | [North, South, etc.] |
| Damage Density | [Impacts per 100 sq ft] |
| Recommended Action | [Repair or replacement] |
Section 9: How Austin Homeowners Should Use Their Report
Once you receive your written storm damage inspection report, don’t just file it away. Actively use it for repairs, insurance coverage, and future maintenance planning.
First 48 Hours:
- Review the report line-by-line
- Highlight unclear technical terms and ask for clarification
- Request any missing photos or measurements
- Begin your insurance claim with your insurance provider
Filing Your Claim:
- Attach the complete report and all photos when filing
- Reference the specific storm by date (e.g., “June 16, 2025 hailstorm in Cedar Park”)
- Include weather data documentation
- Keep copies of everything you submit
During the Adjuster Visit:
- Provide the adjuster with your inspection report upfront
- Walk the property with them, referencing documented damage points
- Ask how their findings compare to your report
- Request written explanation for any discrepancies
If Claim Is Partially Denied:
- Request written explanation from insurer
- Compare adjuster notes to original report line-by-line
- Obtain second opinion from another qualified insured roofing contractor
- File appeal with additional photos and local weather data
- Consider independent engineer report for major disputes
For Future Reference:
- Keep digital backups in cloud storage
- Bring the report to any second-opinion roofing company
- Use documented roof’s current condition as baseline for future storms
- Schedule regular inspections to maintain documentation history
Proper documentation today prevents costly repairs and claim denials tomorrow.
Frequently Asked Questions
How long does a professional storm damage inspection take in Austin?
A typical single-family home in Austin, Cedar Park, or Pflugerville takes about 60–90 minutes for a thorough inspection, including attic checks and photos. Certified inspectors need adequate time to document all components properly.
Larger or steeper roofs, particularly multi-level properties common in Westlake or similar areas, can take 2 hours or more to inspect and document. Complex roofing systems with multiple penetrations, valleys, and materials require additional attention.
The written report is usually delivered within 24–72 hours after the site visit, depending on how detailed the photo and measurement review needs to be. Rushing this process often results in incomplete documentation that won’t hold up during the claims process.
Do I really need a written report if the roofer already showed me damage?
Verbal explanations and on-roof photos are helpful starting points, but insurers and future buyers rely on written, organized reports. Casual text messages or conversations won’t hold up when your insurance company reviews the claim.
A written report protects you by locking in what was found, when it was found, and how it ties to a specific storm date in the Austin area. This establishes the chain of evidence that prevents disputes over whether damage was storm related or from material defects.
Always insist on a written, itemized report from any contractor you consider for storm damage repairs, especially after a major storm with large hail. The difference between a free inspection verbal summary and a comprehensive inspection report can determine whether your claim gets approved.
Will my insurer accept a storm damage report from any roofing company?
Most Texas insurers will review reports from licensed, insured roofing contractors or independent inspectors. However, they typically still send their own insurance adjuster to verify findings and assess the final inspection scope.
Choose a roofing company that regularly works with carriers in Central Texas and understands how to document hail and wind damage in formats adjusters recognize, following the same best practices used to find reputable roofing companies and avoid storm-chaser scams. Local building codes knowledge and familiarity with the insurance process in Travis, Williamson, and Hays counties matters.
For very large or disputed claims, insurers sometimes request additional documentation from engineers. However, a strong initial report from qualified repair services still speeds up the process significantly and provides the foundation for appeals if needed.
What if my inspection report shows damage but my claim is denied?
First, request a written explanation from your insurance company comparing the adjuster’s notes to your original inspection report line-by-line. Denials often cite pre-existing wear, but your report should distinguish visible damage patterns that indicate storm damage versus gradual deterioration.
Obtain a second opinion from another qualified Austin-area inspector or roofing contractor if there are major discrepancies about cause or extent of damage. Fresh documentation from certified inspectors can identify what the first assessment missed.
You can file an appeal with additional photos, local weather data for the specific storm date, and independent reports to strengthen your case. About 15-20% of claims face initial denial, but many are overturned with proper documentation and persistence.
How often should I get a storm damage inspection even without obvious leaks?
Schedule at least a visual professional inspection every 1–2 years in Austin due to frequent hail and wind events. Additionally, get your roof inspected after any storm with reported 1-inch or larger hail or 55+ mph winds in your ZIP code—even if you don’t immediately notice damage.
Many hail bruises and lifted shingles don’t leak immediately but shorten roof lifespan by 5-10 years and can turn into active leaks several seasons later. Future leaks often trace back to storm damage that went undetected and unrepaired, which is why understanding common roofing problems and systems helps homeowners spot issues earlier.
Regular documentation through routine inspections helps establish your roof’s pre-storm condition. This baseline proves invaluable if you need to demonstrate damage from a future event or show an insurance adjuster that your structural integrity was solid before a severe weather event struck.
Contents
- Why Your Storm Damage Report Matters in Austin
- Overview: What Is a Storm Damage Inspection Report?
- Section 1: Property & Storm Event Details
- Section 2: Exterior Roof Condition & Damage Summary
- Section 3: Detailed Roof Component Findings
- Section 4: Attic, Ceiling, and Interior Observations
- Section 5: Site Conditions, Safety Hazards, and Code Issues
- Section 6: Photographic Evidence and Diagrams
- Section 7: Repair Recommendations, Scope, and Cost Ranges
- Section 8: Insurance-Friendly Summary and Documentation Notes
- Section 9: How Austin Homeowners Should Use Their Report
- Frequently Asked Questions

