

When homeowners deal with roof leaks, the first thing they usually blame is shingles. But in reality, the role of flashing in leak prevention is far more important than most people realize. Flashing is what protects the most vulnerable parts of your roof — the joints, seams, and penetrations where water is most likely to sneak in. When flashing fails, leaks follow, even if the shingles themselves still look fine from the ground.
This article breaks down why flashing is the real workhorse behind a leak-free roof, how it directs water away from problem areas, and why so many roof leaks traced during inspections have nothing to do with missing or damaged shingles. By understanding how flashing works — and what happens when it doesn’t — you’ll be better equipped to spot early warning signs, ask the right questions during inspections, and protect your home from costly water damage long before it turns into a major repair.
Key Takeaways
- Roof flashing is the primary defense against leaks at penetrations and intersections—including chimneys, skylights, vents, valleys, and roof edges—not shingles.
- Most roof leaks discovered during heavy rains or snowmelt events trace back to missing, damaged, or poorly installed flashing rather than problems with shingles or panels.
- Correct material selection (galvanized steel, aluminum, copper, or rubberized products) combined with professional installation determines how long flashing will reliably keep water out of your home.
- Annual inspections plus post-storm checks dramatically reduce the risk of major water damage, mold growth, and structural rot caused by flashing failure.
- Homeowners should contact a qualified roofing contractor as soon as they notice stains on ceilings or walls, visible rust, gaps near roof openings, or musty odors—rather than waiting for a major leak.
What Roof Flashing Is (and Why It Matters More Than Shingles for Leaks)
When most homeowners think about roof leaks, shingles come to mind first. But here’s what experienced roofing professionals know: flashing is a thin material installed at joints, seams, and roof penetrations that actually does the heavy lifting when it comes to keeping water out. While shingles or metal panels shed water across the roof surface, it’s the flashing that creates a watertight seal at the vulnerable areas where different surfaces meet.
Think of your roof as a system rather than a single surface. The open field of shingles handles straightforward rain runoff, but every chimney, vent pipe, skylight, and roof edge creates a potential entry point for water. Properly installed flashing acts as a protective barrier at these critical areas, redirecting water away from seams and onto the roof surface where it can drain safely into gutters.
- Flashing is a thin, waterproof material (usually metal) that seals and directs water away from joints, seams, and other roof penetrations
- Common flashing materials on U.S. homes include galvanized steel, aluminum flashing, copper flashing, vinyl, and rubberized asphalt
- Metal flashing remains the standard around most penetrations due to its durability and ability to form tight seals
- According to industry data from the National Roofing Contractors Association, improper or failed flashing is the number one cause of roof leaks—more than shingle defects
- Roofing contractors frequently report that leak calls after heavy rain or snowmelt events trace back to flashing problems, not damaged shingles
How Flashing Prevents Roof Leaks in Critical Areas
Water doesn’t simply fall straight down. Gravity pulls it into crevices, wind driven rain forces it sideways and upward, and capillary action can draw moisture into the tiniest gaps between roofing materials. These forces make roof transitions—where the roof plane meets walls, chimneys, or other surfaces—far more vulnerable than flat shingle fields.
Correctly designed flashing systems intercept water at these transition points and direct water onto the roof surface or into gutters before it can reach the roof deck, sheathing, or interior walls. The flashing protects these vulnerable areas by reshaping how water flows, essentially creating channels that force moisture outward rather than allowing it to seep inward.
- Flashing creates a physical barrier that blocks water intrusion at joints and penetrations where shingles alone cannot form a complete seal
- In climates with heavy rain or snow—such as the Pacific Northwest, the Midwest snow belt, and coastal storm zones—durable, continuous flashing is essential for preventing chronic leak issues
- Building codes adopted in many U.S. states between 2018–2024 explicitly require flashing at specific penetrations and intersections to meet minimum waterproofing standards
- The layered installation approach (roof deck, underlayment, flashing, shingles) creates redundancy so water is directed outward at multiple levels
- Flashing is particularly important where two roof planes meet, where the roof intersects with a vertical wall, and around any object that penetrates the roof structure
Types of Flashing Materials and Where They Work Best
Material choice affects flashing lifespan, corrosion resistance, appearance, and suitability for specific climates or roof designs. The right flashing material for your home depends on your roofing system, local weather patterns, budget, and aesthetic preferences.
- Galvanized steel is the default choice on many asphalt-shingle roofs because it balances cost and durability, especially when properly coated with a zinc layer that resists rust
- Aluminum is often chosen for its light weight and flexibility, making it easy to form around complex shapes—though it needs protective coatings when used against masonry or in salty coastal environments
- Copper is used on high-end or historic homes where long service life (50+ years) and the distinctive patina aesthetics justify the higher cost, especially around chimneys and dormers
- Vinyl flashing works well for low-slope roofs and areas requiring flexibility, though it’s less durable than metal in extreme temperatures
- Rubberized asphalt flashings (self-adhering membranes) are common around vents, skylights, and complex transitions where flexibility and self-sealing properties are important
- When selecting materials, avoid mixing dissimilar metals (such as copper and galvanized steel) without proper isolation, as galvanic corrosion can accelerate deterioration
Common Flashing Locations That Make or Break a Leak-Free Roof
The critical areas of your roof aren’t the open shingle fields—they’re the intersections and penetrations where most leaks actually begin. Every place the roof plane changes direction or meets another surface needs a tailored flashing solution to maintain the underlying roof structure’s integrity.
Understanding where flashing plays the most important role helps you know what to inspect and what to discuss with your roofing contractor. The following sections break down the high-risk areas and explain how flashing prevents leaks at each location.
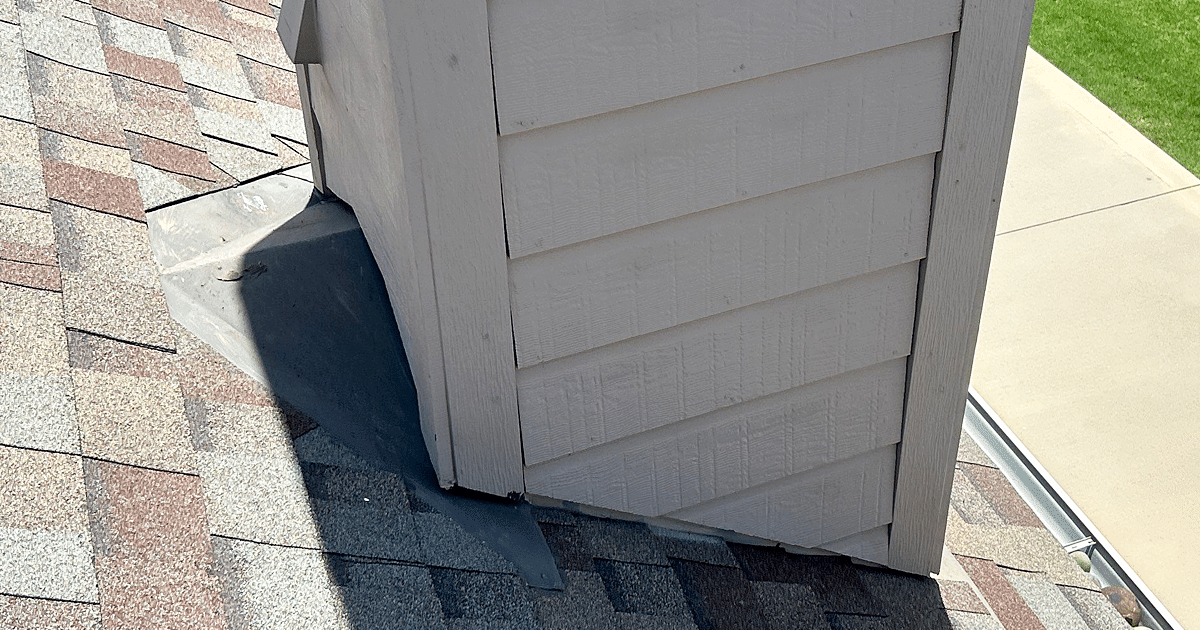
Chimney and Masonry Flashing
Chimneys are one of the most leak-prone roof features because masonry expands and contracts at different rates than the roof deck, stressing the flashing joint over time. This constant movement—combined with exposure to weather from all sides—makes chimney flashing a prime candidate for failure.
A typical chimney flashing system includes multiple components working together:
- Base flashing (also called step flashing along the sides) attaches to the roof surface at the base of the chimney, creating an upward-facing lip
- Counter flashing is cut into mortar joints and overlaps the base flashing, shedding water away from the joint
- An apron or cap flashing protects the downslope side where water volume is highest
- For wider chimneys, a cricket (small peaked structure) diverts water around the chimney rather than letting it pool
Cracks in mortar, missing counter flashing, or corroded metal are frequently discovered during fall and spring roof inspections. A common scenario: water stains appear on a fireplace surround after a prolonged 2023–2024 rain event. The source? Rusted chimney flashing that had allowed water to seep behind the masonry for months before becoming visible inside.
Skylight and Roof Window Flashing
Skylights and roof windows require carefully integrated skylight flashing kits—usually supplied by the manufacturer—to seal around their frames. These kits typically include step flashing, apron pieces, and headwall components designed to work with specific roof pitches and roofing materials.
- Incorrect DIY installation—such as relying only on caulk instead of layered metal flashing—leads to leaks at skylight corners, especially during wind-driven storms
- Modern skylight systems from manufacturers typically include step and apron flashing components designed to match your roof pitch and material
- Skylight leaks often appear intermittently, showing up only when rain comes from a particular direction or intensity
- When replacing old skylights (20+ years old), budget for new flashing as part of the project rather than trying to reuse corroded pieces—the labor is already happening, and old flashing rarely provides reliable leak prevention
Vent Pipe and Roof Vent Flashing
Vent pipe flashing (commonly called “boots”) consists of cylindrical or cone-shaped components that seal around plumbing vent pipes, furnace vents, and other roof penetrations. These flashings combine a metal base with a flexible rubber collar that fits tightly around the pipe.
- UV exposure and temperature swings often crack the rubber collars on these flashings after 10–15 years, causing slow leaks that show up as ceiling stains near bathrooms or kitchens
- Metal hood vents and attic vents also require base flashing so that water flows around, not under, the vent housing
- Vent pipe flashing failures are among the most common causes of “mystery leaks” because the damage can be subtle and located far from where water eventually appears inside
- Simple periodic checks of vent boots during annual maintenance can prevent expensive drywall and insulation damage
Valleys, Eaves, and Roof Edges
Valleys collect large volumes of water where two roof planes meet, making continuous valley flashing crucial—especially in regions with intense thunderstorms or heavy snowfall. The roof’s edge is another often-overlooked critical area where flashing prevents premature roof replacement by protecting the deck and fascia.
- Open-metal and closed-cut shingle valleys both rely on valley flashing underneath to carry water safely to gutters
- The drip edge at eaves and rakes is a metal strip that protects the roof deck edge and fascia from wind driven rain while helping direct water into the gutter system
- Missing or improperly lapped edge flashing allows water to wick back under shingles, leading to rot at the roof perimeter
- A common discovery during 2022–2024 gutter replacement projects: severe roof edge rot caused by the absence of drip edge flashing, requiring deck repairs before new gutters could be installed
Roof-to-Wall Intersections and Dormers
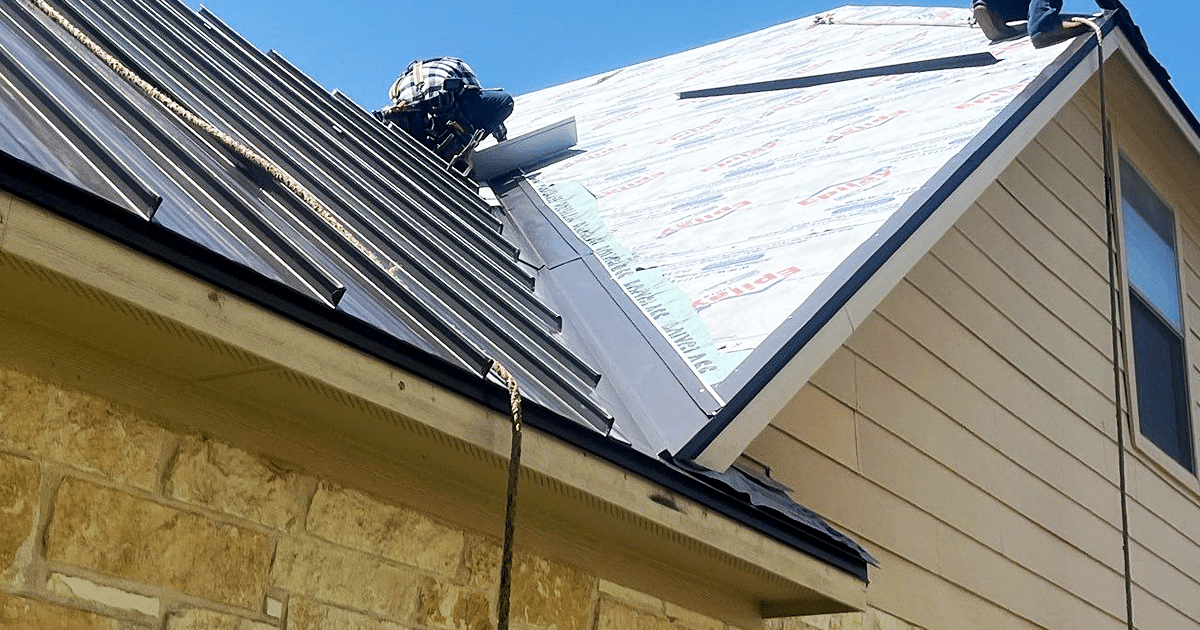
Where the roof meets a vertical wall—along sidewalls, behind dormers, or at headwalls—step flashing and headwall flashing create the critical barrier that keeps water from entering wall cavities.
- Step flashing consists of L-shaped pieces woven with each shingle course, creating a staircase of metal that channels water down onto the roof surface
- Each “step” overlaps the shingle below by at least 3 inches, ensuring water flows outward rather than behind the wall
- Kickout flashing at the bottom of roof-to-wall intersections directs water away from vulnerable areas and into the gutter, preventing it from running behind siding
- Siding replacement projects sometimes accidentally disturb or cover existing flashing, causing leaks to appear months after the exterior work is finished
- Coordinating between siding and roofing contractors ensures flashing remains visible and functional, not buried behind caulk or trim
Warning Signs of Flashing Problems Homeowners Should Watch For
Early detection of flashing issues costs far less than repairing rotten framing, soaked insulation, or moldy drywall after a major leak has developed. Knowing what to look for—both inside and outside your home—can help you catch problems before they become expensive emergencies.
Interior warning signs:
- New water stains on ceilings or walls, particularly near chimneys, skylights, or plumbing vents
- Bubbling paint, peeling wallpaper, or discoloration on upper walls
- Musty odors after storms or snowmelt, indicating hidden mold growth
- Damp spots in attics near roof penetrations or roof-to-wall intersections
Exterior warning signs:
- Visible rust or visible cracks on metal flashing components
- Lifted, bent, or missing sections of flashing
- Cracked or deteriorated vent boots
- Gaps where the roof meets walls or chimneys
- Deteriorated sealant around flashing edges
- Damaged flashing pieces after storms
Leaks caused by flashing can be intermittent—only appearing during wind-driven rain from a particular direction—so don’t ignore “one-time” stains. Any sudden change after a major weather event (such as a 2024 spring hailstorm or hurricane) merits a professional roof inspection focused specifically on flashing condition.
Inspection, Maintenance, and When to Replace Flashing
Even well-installed flashing has a finite life, especially on roofs that are 15–25 years old or older. Quality metal flashing can last 20–30 years or more, but exposure to harsh conditions, temperature extremes, or coastal salt air can accelerate deterioration.
Inspection recommendations:
- Schedule at least one professional roof inspection annually (spring or fall works well) with specific attention to flashing at chimneys, valleys, vents, and roof edges
- Arrange additional inspections after severe storms, heavy snow loads, or hurricane-level winds
- Look for early signs of rust, sealant failure, or separation from adjacent surfaces
Maintenance tasks:
- Gently clear debris from valleys where it can trap moisture against flashing
- Reseal minor gaps with compatible sealants as recommended by your roofing professional
- Check that fasteners haven’t backed out or loosened
When to replace:
- Advanced rust or corrosion that has penetrated the metal
- Large gaps or visible separation from walls, chimneys, or shingles
- Repeated leaks despite repair attempts
- During any full roof replacement—reusing old flashing undermines the new roofing system’s lifespan
- Building codes and manufacturer warranties often require modern flashing details when installing new roofing materials
Keep basic documentation of inspections, repairs, and roof work completed between 2010–2025. This record helps you track when flashing is approaching end of life and provides valuable information for future roofing contractors or home buyers.
Why Professional Installation Is Crucial for Leak-Free Flashing
Flashing performance depends heavily on overlap distances, sequencing with underlayment and shingles, and proper integration with gutters, siding, and masonry. Getting these details right requires experience and knowledge of local building codes.
- An experienced roofing contractor understands local code requirements, climate demands, and manufacturer specifications for specific flashing systems
- Proper installation means nailing only through the horizontal leg of step flashing (not the vertical leg), maintaining correct overlaps, and ensuring flashing integrates with the roofing system’s drainage plane
- DIY patch jobs—such as smearing caulk over cracked flashing—may hide problems temporarily but typically fail during the next major rain or freeze-thaw cycle
- Sealants should be placed under flashing or at protected joints, not smeared over exposed areas where they trap moisture
What to look for in a professional roofing contractor:
| Qualification | Why It Matters |
|---|---|
| State licensing and insurance | Protects you from liability and ensures minimum competency standards |
| Local references and track record | Demonstrates experience with regional climate challenges |
| Written estimates that include flashing details | Shows they understand flashing is integral, not an afterthought |
| Manufacturer certifications | May provide extended warranty coverage and indicates specialized training |
Professional crews can often bundle flashing upgrades with other work—such as a 2025 re-roof or skylight replacement—saving labor costs compared to scheduling separate visits. When getting estimates, ask specifically how flashing will be handled at chimneys, valleys, skylights, and roof-to-wall transitions.
FAQ: Roof Flashing and Leak Prevention
How long does roof flashing typically last compared to shingles?
Quality metal flashing can often last as long as or longer than asphalt shingles—typically 20–30 years under normal conditions. However, flashing may need earlier replacement in harsh coastal environments, industrial areas with airborne pollutants, or climates with extreme temperature swings. Rubber components on vent boots generally have shorter lifespans (10–15 years) due to UV degradation.
Can flashing be repaired, or does it always need to be replaced?
Minor issues like small gaps or limited sealant failure can sometimes be repaired with compatible materials. However, flashing showing visible rust that has penetrated the metal, significant cracking, large gaps, or evidence of previous failed repairs should be replaced entirely. Patching severely deteriorated flashing provides only temporary relief and may mask ongoing water intrusion.
Do I need new flashing every time I replace my roof?
Most modern roof replacements—especially those completed after 2015—include new flashing as part of best practice and code compliance. Reusing old flashing pieces is generally discouraged because the labor to properly integrate old flashing often exceeds the cost of new materials, and aged flashing may fail before the new roofing system reaches the end of its service life. Manufacturers may also void warranty coverage if old flashing is reused.
Is caulking alone enough to stop a flashing leak?
Caulk and sealants are supplements, not substitutes, for properly installed flashing. Relying only on caulk is a temporary fix that often fails within a season or two as the sealant degrades from UV exposure and temperature cycling. Effective leak prevention requires correctly layered flashing that sheds water mechanically, with sealants used only at protected joints or as a secondary barrier.
How often should a professional inspect my flashing if I live in a storm-prone area?
Homeowners in regions with frequent hail, heavy snow, hurricanes, or severe thunderstorms should schedule at least one professional inspection annually, plus additional checks after any major weather event. Inspections should specifically focus on high-risk flashing locations: chimneys, skylights, roof valleys, vent boots, and roof-to-wall intersections. Catching damage early—before water reaches the roof deck or interior—can prevent costly structural integrity repairs.
Contents
- What Roof Flashing Is (and Why It Matters More Than Shingles for Leaks)
- How Flashing Prevents Roof Leaks in Critical Areas
- Types of Flashing Materials and Where They Work Best
- Common Flashing Locations That Make or Break a Leak-Free Roof
- Warning Signs of Flashing Problems Homeowners Should Watch For
- Inspection, Maintenance, and When to Replace Flashing
- Why Professional Installation Is Crucial for Leak-Free Flashing
- FAQ: Roof Flashing and Leak Prevention

